
How to Enhance Sora AI Video Quality: A Step-by-Step Guide
- What Can You Improve in a Sora Video?
- How to Enhance a Sora Video With GoEnhance AI
- Example Sora 2 Video
- How to Check Whether the Enhanced Sora Video Looks Better
- Common Sora Video Quality Problems and Fixes
- Frequently Asked Questions
To improve a Sora video, first identify what looks wrong. If the clip is too soft or low-resolution, use GoEnhance’s Sora 2 video upscaler and choose an output resolution available for your clip. If the main issue is noise, mild blur, or uneven color, try the separate AI Video Enhancer. Then inspect both still frames and moving sections before downloading.
Upscaling can create a larger frame and refine visible details, but it cannot guarantee recovery of information that was never present in the source. Check faces, fine textures, text, and motion so the final clip still looks like your original scene.
What Can You Improve in a Sora Video?
Different problems call for different adjustments. Use this quick guide before processing:
| What you notice | What to try in GoEnhance | What to check afterward |
|---|---|---|
| The video looks soft or too small for your publishing format | Use the AI Video Upscaler and select a suitable output resolution | Fine edges, faces, and small objects |
| Grain, noise, or compression marks distract from the scene | Try the AI Video Enhancer | Whether noise is reduced without wiping out texture |
| Colors look flat or lighting feels uneven | Use video enhancement or color correction options available in the workflow | Skin tones, highlights, shadows, and consistency between shots |
| The subject changes shape or has visual errors | Revisit the original Sora generation or edit the source clip | Whether the problem is part of the generated scene rather than softness or noise |
GoEnhance’s Sora workflow describes upscaling 720p or 1080p clips toward 4K, while its separate enhancer covers noise, blur, and color adjustments. Choose the resolution and options shown for the model you select in the app.
How to Enhance a Sora Video With GoEnhance AI
1. Export the Sora clip you want to keep
Choose the version with the best composition and motion. Keep the original export so you can compare it with the processed video. Avoid repeatedly exporting through other apps before enhancement, because each extra compression can soften edges or add artifacts.
If you only need one scene, trim the clip to that section before uploading. The current Video Upscaler screen shows a file-size limit under 100 MB; its 1080p setting indicates support for videos up to 60 seconds at that resolution. The app displays the applicable limit beside the upload and resolution controls.
2. Open the video upscaler and upload the file
Go to the GoEnhance Video Upscaler, choose the Video tab, and upload your Sora export. The app accepts the file from your device or from its history when available.
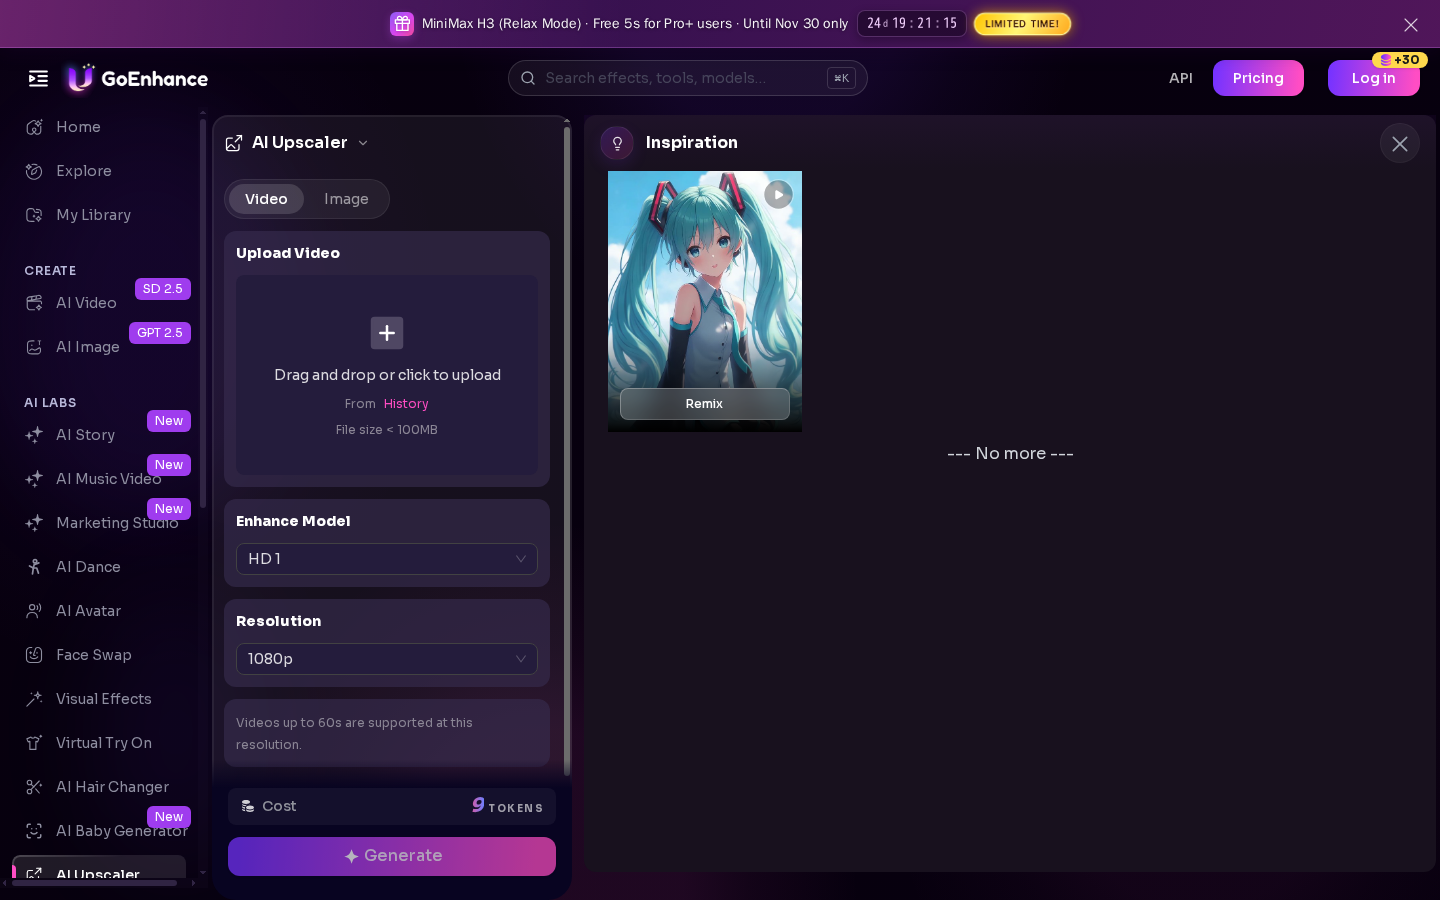
GoEnhance Video Upscaler screen captured on November 6, 2026. The current interface shows the video upload panel, enhancement model, and resolution controls.
3. Choose an enhancement model and output resolution
Select an enhancement model, then choose a resolution offered for that model. GoEnhance’s Sora 2 upscaler page describes a workflow for taking 720p or 1080p Sora exports to a 4K output. The live app shows which settings are available for the file and model you selected.
Use the resolution that fits the place you plan to publish the video. A 4K export can be useful for a larger screen or a high-resolution delivery, while a lower target may be enough for a smaller social post.
4. Generate the enhanced video
Click Generate and wait for the job to finish. If the clip is low-resolution and also has noise or color issues, start with the resolution pass and review that result first. Then use the AI Video Enhancer only if a specific issue remains. Processing one problem at a time makes it easier to see which change helped.
5. Review the result before downloading
Compare the processed clip with the original at the same playback size. Check a few representative moments rather than judging the video from its first frame alone:
- A face or character in close-up
- Hair, fabric, leaves, or other fine textures
- Fast movement and camera pans
- On-screen text, signs, or sharp edges
- A dark or brightly lit section
Look for clearer edges and reduced noise, but also watch for invented-looking textures, halos, flicker, or a change in the scene’s color. If the result looks less natural, try another available model or resolution and compare again.
6. Download the version that looks best
When the video looks right in both still frames and motion, download it for editing or publishing. Keep the original file alongside the enhanced version so you can return to it if you want a different treatment later.
Example Sora 2 Video
The clip below is the example video provided on GoEnhance’s Sora 2 upscaler page:
How to Check Whether the Enhanced Sora Video Looks Better
A larger resolution number alone does not tell you whether the clip improved. Compare the original and enhanced versions using the same scene and playback size.
- Check detail: Are edges and textures easier to see without looking unnaturally sharp?
- Check faces and objects: Do facial features, hands, clothing, and objects stay consistent from frame to frame?
- Check motion: Do hair, edges, and fast-moving subjects stay stable without flicker or ghosting?
- Check color: Do skin tones and lighting still match the original scene?
- Check the full clip: Does the improvement hold from the opening through the final seconds?
If your workflow allows a side-by-side preview, use the same frame on both sides. For a quick manual comparison, pause the original and enhanced files at the same timestamp.
Common Sora Video Quality Problems and Fixes
The video still looks blurry after upscaling
Start with the cleanest original export. If the source is heavily blurred or out of focus, there may not be enough detail to reconstruct. Try a resolution closer to the source and compare it with the larger output.
Fine details look crunchy or artificial
Inspect the result at normal viewing size as well as zoomed in. Try another available model or a lower output resolution if the app offers one. Very small texture changes can look exaggerated when viewed at high zoom.
Noise is still visible
Use the AI Video Enhancer for the remaining noise or compression issue, then review details such as hair, fabric, and shadows to make sure they remain visible.
Colors still look flat or too dark
Check the original clip first. If the source itself is washed out or underexposed, try the available enhancement or color options and compare the same frame before and after.
The subject is warped or changes between frames
Upscaling is intended to improve the video’s visual quality, not rewrite what happens in the scene. If the Sora generation contains a visual mistake, return to the source project and choose a better generation or edit before running the upscaler again.
Frequently Asked Questions
Can I upscale a Sora video to 4K?
GoEnhance’s Sora 2 upscaler page describes processing 720p and 1080p Sora clips toward 4K. In the app, select a resolution available for the model and file you are using.
Does upscaling restore details missing from a Sora video?
Upscaling can refine edges and estimate detail for a larger output, but it cannot guarantee an exact recovery of information missing from the source. Review faces, text, and fine textures before using the result.
Should I enhance a Sora video before or after editing?
For a short clip, enhance the source you plan to keep, review it, then add subtitles or final edits. If you already have a longer edit, you can process the final video when the whole edit needs the same treatment. Keep an original copy for comparison.
Can I improve Sora video quality for free?
Yes. GoEnhance says new users can try the Sora 2 workflow for free. Paid plans provide additional access and features; see the current pricing page.