How to Make a Video Animation: I Tested the AI Workflow with Real Footage
- 1. Making A Video Animation Is Easier When You Start With Real Footage
- 2. What “Make A Video Animation” Means Today
- 3. How To Make A Video Animation With GoEnhance AI
- 4. Best Use Cases For AI Video Animation
- 5. Practical Tips For Better Video Animation Results
- 6. Common Mistakes To Avoid
- 7. Why I Would Use GoEnhance For This Workflow
- 8. FAQ
- 9. Conclusion: Start With A Real Clip, Then Turn It Into Animation
1. Making A Video Animation Is Easier When You Start With Real Footage
The fastest way to make a video animation today is to start with a real clip that already has motion, framing, and a clear subject.I used to think video animation always meant storyboards, character rigs, keyframes, and a long editing timeline. That still matters for professional animation work, but it is not the only path anymore. For short-form content, product videos, outfit clips, fitness demos, dance videos, and social media posts, I usually get faster results by turning an existing video into an animated version.
A real video already contains the hard parts: movement, timing, subject position, and camera rhythm. With an AI video-to-video workflow, I can keep that structure and change the visual style into something more animated, illustrated, or story-driven.
That is why I see AI video animation as a practical production shortcut. It is not just a filter. When the source video is clean, the result can feel like a new creative version of the same clip, not just an effect placed on top.
2. What “Make A Video Animation” Means Today
Making a video animation today often means converting an existing video into an animated style, rather than creating every frame from scratch.
There are still several ways to make animation. Traditional animation gives the most control, but it takes more time and skill. Basic video filters are fast, but they usually only change the surface look. AI video-to-video animation sits in the middle: it uses the original video as the motion base, then restyles the footage into a more animated result.
| Method | How It Works | Best For | Difficulty |
|---|---|---|---|
| Traditional animation | Draw, rig, model, or keyframe scenes manually | Films, original characters, complex storytelling | High |
| Basic video filters | Add effects or color changes over footage | Quick edits and casual social posts | Low |
| AI video-to-video animation | Upload a real video and convert it into an animated style | OOTD, fitness, dance, product, lifestyle, and creator videos | Low to medium |
In my own workflow, I do not treat AI animation like a full studio replacement. I treat it as a creative converter. The original video gives the tool a strong base to follow, and the animation style gives the final clip a new visual identity.
This is especially useful when the goal is not to make a full animated movie, but to create a short animated-looking clip for social media, marketing, storytelling, or content testing.
3. How To Make A Video Animation With GoEnhance AI
The cleanest workflow is to upload a short, clear source video, choose an animation style, generate a preview, and adjust from there.
I would not start with a long or messy video. For the first test, I usually choose a 5 to 15 second clip. That is long enough to judge the motion and style, but short enough to test quickly if the first result does not work.
Here is how I would use GoEnhance AI for this process.
3.1 Prepare A Clear Source Video
A clear source video gives the AI a better structure to follow.
Before uploading, I usually check these points:
- The main subject is easy to see.
- The lighting is not too dark.
- The camera is not shaking too much.
- The movement is readable.
- The background is not overly busy.
- There are not too many people competing for attention.
For example, a simple OOTD video with one person standing in the center of the frame is usually easier to convert than a crowded street clip. A fitness demo with one clear movement is usually better than a low-light clip with heavy motion blur.
The original video does not have to look perfect, but it should be easy to understand. If I cannot clearly see the subject, the AI will usually have a harder time too.
3.2 Upload The Clip To The Video-To-Video Workflow
The video-to-video workflow works best when the original footage already has a clear subject and motion direction.
After preparing the clip, I upload it into the video to video workspace. This is where the tool reads the movement, subject position, and visual structure of the source video.
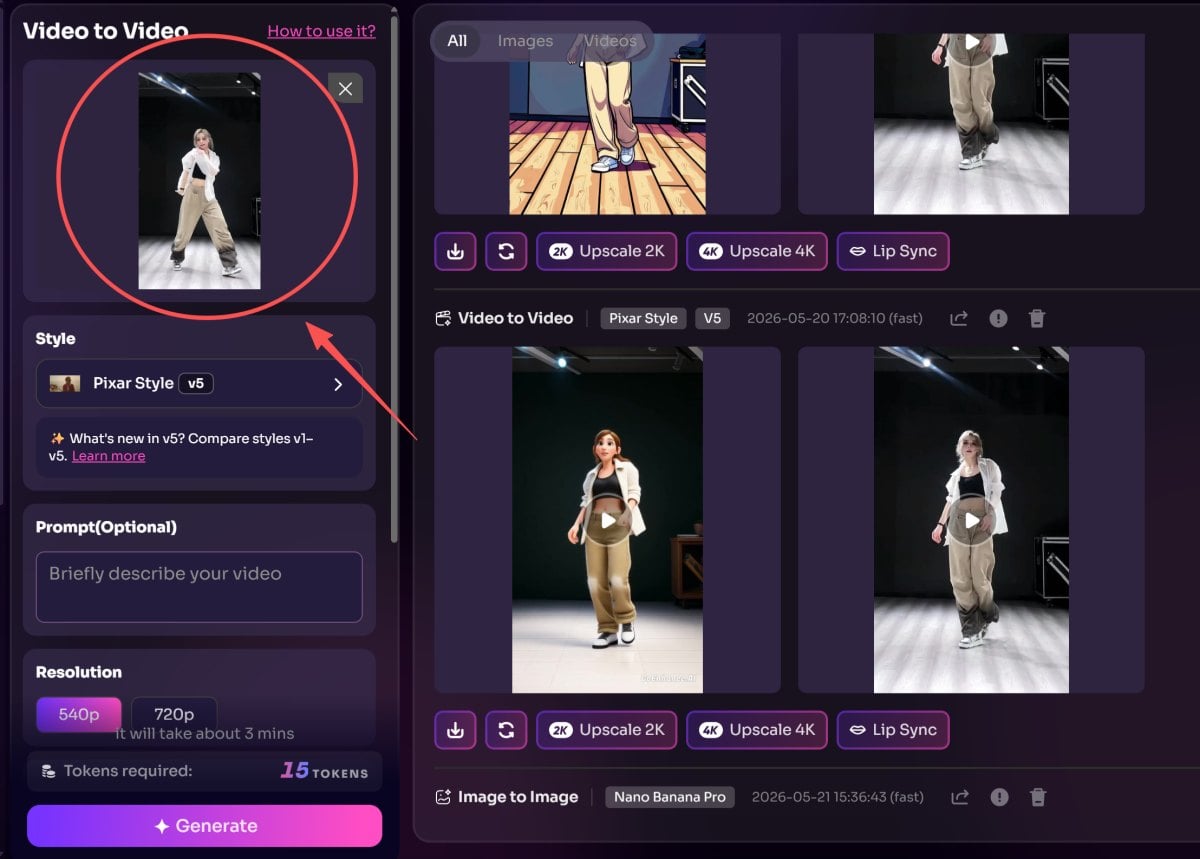
I like this approach because it gives the AI a real motion base. If the clip shows someone walking, stretching, dancing, turning around, or holding a product, the generated version can follow that original movement more naturally than a text-only workflow.
For the first upload, I keep the scene simple. One person, one pet, one product, or one main action is usually easier to control than a complicated scene with several moving subjects.
3.3 Choose An Animation Style That Matches The Goal
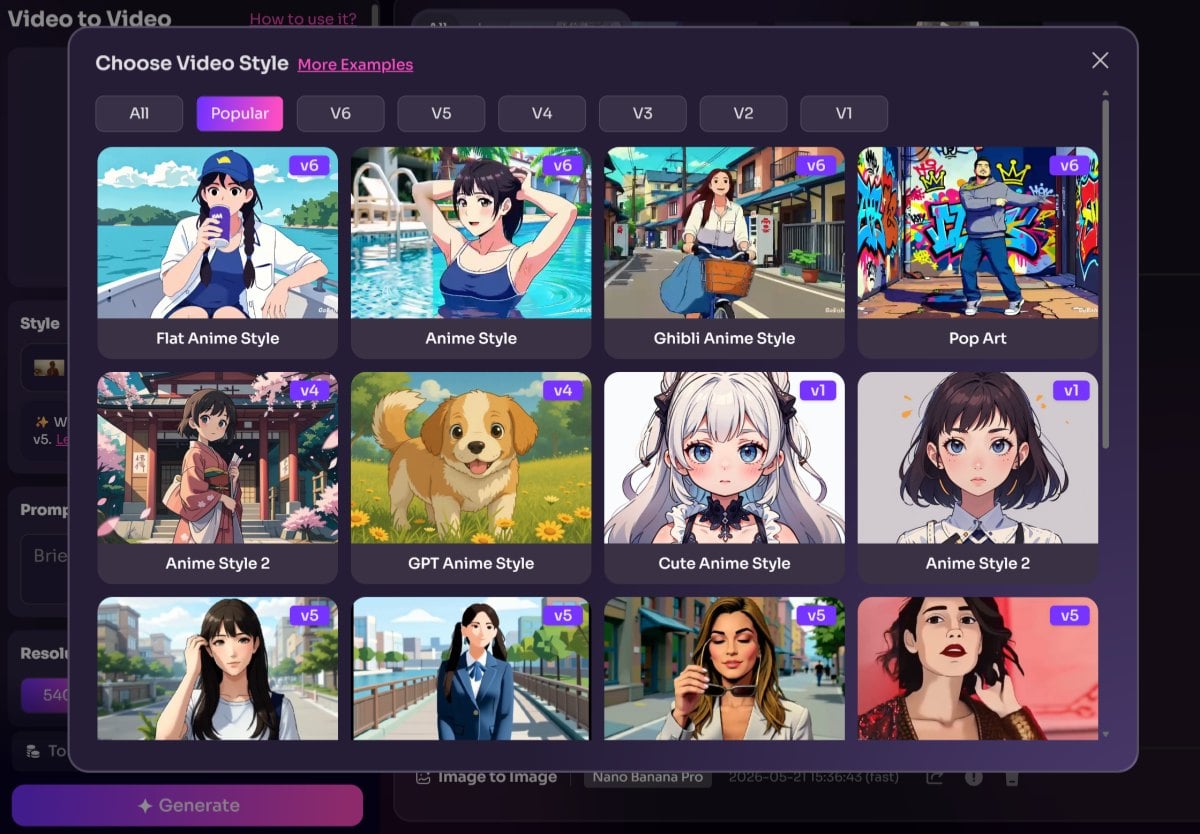 The best animation style is the one that fits the content purpose, not the one that looks the most dramatic.
For fashion content, I usually prefer a clean illustrated or soft 2D direction because clothing shape and color still need to be readable. For children’s story content, a warmer storybook style works better. For fitness, I care more about body movement and clear outlines. For wellness or lifestyle videos, I usually avoid harsh effects and choose something calmer.
| Source Video Type | Better Style Direction | Why It Works |
|---|---|---|
| OOTD / fashion | Clean illustration, soft 2D, polished character style | Keeps outfit shape and color easier to read |
| Children’s story / animal content | Storybook, warm illustration, soft animation | Feels friendly and family-safe |
| Fitness / sports | Bright animated style with clear outlines | Keeps movement and body position visible |
| Wellness / yoga / lifestyle | Calm, soft, gentle stylized look | Matches relaxing content better |
| Dance / performance | More expressive animated style | Makes rhythm and movement feel stronger |
When the goal is specifically to turn real footage into an animated version, I would use the video to animation converter instead of treating it like a small visual filter.
3.4 Generate, Review, And Adjust
The first generated result should be treated as a draft, not always the final version.
After generating the animated video, I watch it in motion. I do not judge it from one frame. A still image may look good, but the full clip may reveal face drift, unstable hands, clothing changes, background flicker, or strange movement around the subject.
When the result is close but not quite right, I usually adjust one thing at a time:
- Try a shorter clip.
- Use a clearer source video.
- Choose a simpler animation style.
- Crop the video around the main subject.
- Avoid scenes with fast camera movement.
- Remove clips with too many moving subjects.
Changing one variable at a time makes the process easier to diagnose. If I change the video, style, crop, and duration all at once, I cannot tell which change actually improved the result.
3.5 Export The Final Animated Video
The final export should be checked based on where the video will be published.
For TikTok, Instagram Reels, and YouTube Shorts, I care most about the opening second. If the first frame or first movement does not catch attention, the animation style may not matter much. For websites, product pages, and campaign tests, I care more about clarity, file size, and whether the video still communicates the original idea.
If the clip includes voice, dialogue, or important information, I also add captions. W3C’s media accessibility guidance explains why captions help users who cannot hear audio or who are watching in sound-off environments. W3C media accessibility guidance
4. Best Use Cases For AI Video Animation
The best use cases are short videos where the motion is already useful, but the visual style needs to be more memorable.
I would not convert every video into animation. If the original clip is confusing, animation will not automatically fix it. But when the subject, movement, and purpose are clear, an animated version can make the content easier to package for social media, branding, or storytelling.
4.1 OOTD And E-Commerce Videos
OOTD and e-commerce videos work well because they usually have a clear subject, simple motion, and a strong visual focus.
For outfit videos, animation can make a normal try-on clip feel more branded. A creator can turn a mirror outfit video into a cleaner illustrated reel. A small fashion brand can test a stylized product showcase without planning a full animated campaign.
I would use this for:
- Outfit-of-the-day videos
- Fashion reels
- Try-on clips
- Product styling videos
- Creator lookbook content
- Short campaign tests
For this use case, clothing needs to stay visible. I would avoid heavy shadows, fast spins, and camera angles that hide the outfit details.
4.2 Children’s Storybook And Animal Videos
Children’s storybook and animal videos work best with soft, simple, and easy-to-read animation styles.
If I were making family-friendly or educational content, I would choose a warm visual direction instead of a loud, high-contrast effect. Pet clips, nature videos, parent-child scenes, and simple learning videos can all feel more charming when converted into a storybook-style animation.
Good examples include:
- Pet moments
- Animal learning clips
- Nature scenes
- Family-friendly shorts
- Cozy storytelling videos
- Educational explainers for kids
For this type of content, I would avoid dark lighting, aggressive effects, and overly complex backgrounds. The result should feel friendly and clear, not chaotic.
4.3 Fitness And Workout Videos
Fitness videos are strong candidates because the original movement gives the animation a clear structure.
A workout clip does not need a complicated story. The viewer mainly needs to understand the movement. AI animation can make the video look more distinctive while still keeping the exercise readable.
I would use it for:
- Gym reels
- Workout demos
- Stretching tutorials
- Sports clips
- Fitness challenge videos
- Trainer social posts
For fitness content, I try to keep the full body visible. If hands, feet, or key joints are cut off, the animated result may become harder to understand. Clarity matters more than dramatic styling here.
4.4 Wellness, Beauty, And Lifestyle Videos
Wellness and lifestyle videos usually work better with calm animation styles than with loud visual effects.
Yoga, stretching, skincare, meditation, daily routines, and body-shaping lifestyle clips do not always need strong visual impact. They often work better when the animated result feels soft, clean, and relaxed.
Useful content types include:
- Yoga clips
- Meditation visuals
- Morning routines
- Skincare videos
- Self-care content
- Body-shaping lifestyle edits
For this use case, I pay close attention to color and background. Soft light, a clean room, and simple composition usually produce a better result than harsh lighting and a messy background.
4.5 Dance And Performance Videos
Dance videos can become much more eye-catching when the animation keeps the rhythm and body movement clear.
For dance clips, I usually care about motion readability first. The style can be expressive, but it should not destroy the timing. If the animated version makes arms, legs, or body direction unstable, the clip may look flashy but not useful.
This use case fits:
- TikTok dances
- Music edits
- Performance clips
- Dance challenges
- Creator videos
- Short character-style scenes
The best source clips usually have a stable camera, a visible full body, and clear separation between the performer and the background.
5. Practical Tips For Better Video Animation Results
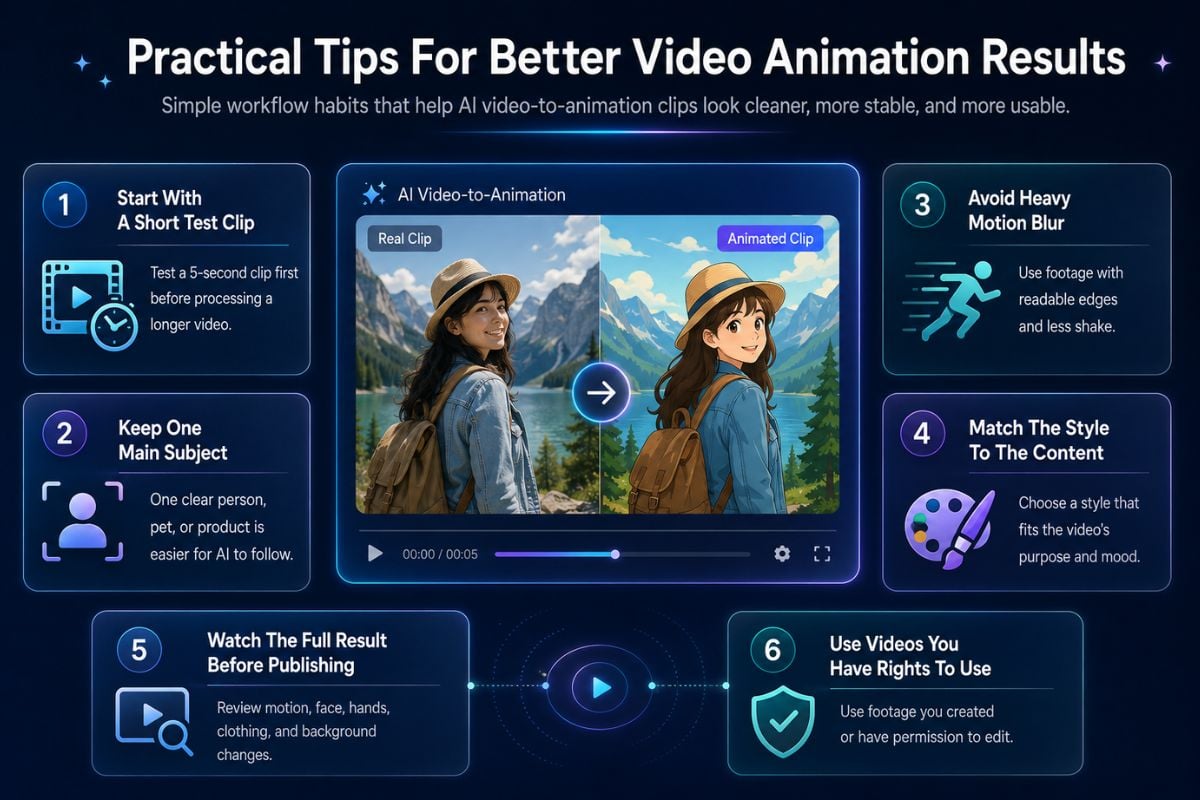 Better AI animation results usually come from better source control, not from more complicated settings.
After testing this type of workflow, I have found that small problems in the source video often become bigger in the generated result. A clearer source clip usually beats a more complex prompt.
5.1 Start With A Short Test Clip
A short test clip helps you judge the style before spending time on a longer video.
I usually test with a 5-second clip first. If the style does not work, I can switch direction quickly. Once the result feels right, I can process a longer version or create more clips in the same style.
5.2 Keep One Main Subject
One clear subject is easier for the AI to follow.
A single person dancing, one dog running, or one product held in frame usually works better than a crowded scene with multiple people, reflections, and fast background movement.
5.3 Avoid Heavy Motion Blur
Motion blur is one of the easiest ways to weaken the result.
If the original video has blurry hands, shaky camera movement, or low-light noise, the animated result may exaggerate those issues. I try to use footage where the subject edges are still readable.
5.4 Match The Style To The Content
The animation style should support the message of the video.
I would not use the same style for a gym workout and a bedtime story clip. One needs energy and clear motion. The other needs warmth and softness. Picking the right style saves a lot of rework later.
5.5 Watch The Full Result Before Publishing
A full playback check is necessary because AI video can change from frame to frame.
I always review the face, hands, clothing, background, and any important product details. If something changes too much during playback, I either simplify the clip or test a different style.
5.6 Use Videos You Have Rights To Use
The safest workflow is to use videos you created yourself or have permission to edit.
This matters more when the video is used for brand, client, or commercial content. AI tools can improve production speed, but they do not remove copyright, likeness, or platform responsibilities. The U.S. Copyright Office also publishes resources around copyright and artificial intelligence, which are worth reviewing for serious projects. U.S. Copyright Office AI resources
6. Common Mistakes To Avoid
Most poor AI animation results come from using the wrong source video or expecting the tool to fix every production problem.
I have made some of these mistakes myself, so I now check for them before generating.
| Mistake | Why It Hurts The Result | Better Choice |
|---|---|---|
| Uploading blurry footage | The AI has less detail to follow | Use a sharper clip |
| Using too many subjects | Motion and identity can become unstable | Focus on one main subject |
| Choosing a style only because it looks cool | The result may not fit the content | Match style to use case |
| Starting with a long video | More time is wasted if the style fails | Test a short version first |
| Using copyrighted clips without permission | It can create legal or platform issues | Use owned or licensed footage |
| Ignoring captions | Some viewers may miss the message | Add captions when speech matters |
The main lesson is simple: AI animation is not only about the tool. It is also about choosing the right video before the generation starts.
7. Why I Would Use GoEnhance For This Workflow
I would use GoEnhance when I already have a real clip and want to quickly explore an animated version without rebuilding the video manually.
The advantage is that the workflow starts from existing footage. That is practical for creators, marketers, small brands, and social media teams that already shoot videos but want a stronger visual style.
Most people do not begin with a full animation plan. They begin with a phone video, a product demo, a dance recording, a workout clip, an outfit video, or a lifestyle shot. A video-to-animation workflow lets them turn that existing material into something more distinctive.
For me, the best fit is not replacing professional animation. The better fit is:
- Testing creative directions faster
- Turning normal footage into stylized content
- Making social videos feel more recognizable
- Repurposing old clips into new visual formats
- Creating campaign drafts before bigger production
- Giving OOTD, fitness, dance, and lifestyle videos a stronger look
That is why I see this workflow as a practical bridge between raw video and polished animated content.
8. FAQ
The most common questions are usually about difficulty, source videos, and whether AI animated videos can be used for real publishing.
8.1 Can I Make A Video Animation Without Animation Skills?
Yes. You can upload an existing video, choose an animation style, generate a result, and review it without learning frame-by-frame animation.
8.2 What Kind Of Video Works Best?
Clear, well-lit videos with one main subject usually work best. Simple motion, stable framing, and visible details make the result easier to control.
8.3 Can I Turn An OOTD Video Into Animation?
Yes. OOTD videos are a strong use case because they usually have a clear person, visible clothing, and simple movement.
8.4 Can I Animate Fitness Or Dance Videos?
Yes. Fitness and dance videos can work well because the original footage already contains strong body movement. I would keep the full body visible and avoid shaky camera work.
8.5 Can I Use AI Animated Videos For Social Media?
Yes, as long as you have the rights to the original footage and the final video follows the rules of the platform where you publish it.
8.6 Do I Need A Long Video?
No. I would start with a short clip first. Once the style works, you can create a longer version or test more clips in the same style direction.
9. Conclusion: Start With A Real Clip, Then Turn It Into Animation
The fastest way to make a video animation is to start with a clean real-world clip and use AI to restyle it into an animated version.
That approach saves time because the video already contains the movement, subject, and camera rhythm. You do not need to draw every frame or build a scene from nothing. You only need to choose the right source video, pick a style that fits the use case, generate a draft, and review the result carefully.
For OOTD videos, e-commerce clips, children’s story content, fitness videos, wellness edits, dance clips, and social media posts, this workflow is especially useful. It gives normal footage a more memorable visual identity without turning the process into a full animation production.
If I were starting from one short clip today, I would keep the source simple, test one style first, and refine from there.